DLNA server with MiniDLNA under Linux / Raspberry Pi
This text does contain Amazon referral links.
DLNA is a great service. With an DLNA server you can distribute videos, music or pictures to almost every Smart TV and / or set top box like an Amazon Fire TV, Apple TV or LG WebOS based systems. With DLNA you don’t have to bother if you’re TV supports the given file format. DLNA does cover this for you. One of the DLNA services which is easy to install, configure and use is MiniDLNA. This article shows you how to setup a MiniDLNA server under a Linux box / Raspberry Pi with a few simple steps.
Which hardware to use?
The good thing is, that you don’t have to use an Intel / AMD based machine to stream Full HD over DLNA. Even a Raspberry Pi with an external USB hard drive attached is capable of streaming Full HD movies over a Gigabit Ethernet. If you want to build yourself a DLNA Raspberry Pi server, I would recommend the following hardware:
A Raspberry Pi (version 4 or 5 for best performance)
Alternatively an AMD / Intel based system
A hard drive with 1TB of storage. (Recommended size. You can always get a bigger one of course.)
Whether you go with the Raspberry Pi setup or not, ensure that you have a hard drive which is big enough to store your media files. As the Linux distribution of choice I recommend you Ubuntu or Debian (this tutorial is also written for Debian and Ubuntu). If you’re going with a Raspberry Pi setup, check out Raspbian which is a Debian made for the Raspberry Pi. To setup your Raspberry Pi with Raspbian, you can checkout the Raspberry Pi image creation tutorial from the Raspberry Pi Foundation.
Why MiniDLNA as the DLNA server software of choice?
Besides MiniDLNA there are plenty of other services available. One of the more popular solutions are MediaTomb and Twonky. Both are the opposite of MiniDLNA. They are coming with complex and more powerful configuration tools. MiniDLNA works with a „keep-it-simple“ method. You basically just have to install the service and tell MiniDLNA where the media files you want to stream are located at.
Besides the „keep-it-simple“ factor, MiniDLNA is also a very resource saving solution. This comes hand in hand with the resources limits a Raspberry Pi is giving us. However, even if you’re going to install a MiniDLNA server on a Intel / AMD based system, a straight forward easy to install and use solution is always the one you should consider first in my humble opinion.
Install MiniDLNA
The Raspbian, Debian and Ubuntu package repositories are already providing the MiniDLNA package. The following command installs the latest available MiniDLNA package onto your system:
user@raspberrypi:~$ sudo apt update && sudo apt install minidlnaDepending on your internet speed, the download and installation of the MiniDLNA package should be done within a minute or two.
Configure MiniDLNA
At this point of the tutorial I assume that your (external USB) hard drive is already formatted and filled with the media you want to share over DLNA. To give you a example which is as accurate as possible, I also assume that your hard drive is already mounted under /mnt/usb. If your hard drive is mounted at a different location, simply replace /mnt/usb with the mount point you had chosen.
The configuration file for MiniDLNA is rather simple. While we could dive deeper into the configuration parameters, we want to keep it as simple as possible as well. The only two parameters which are interesting for our setup for now are media_dir and user. To set these two configuration parameters, open the configuration file with your editor of choice and go on reading this article. The configuration file is located at /etc/minidlna.conf.
Start MiniDLNA as a non-root user
By default the MiniDLNA process is started as the root user. While this makes things easier, it’s a security issue which should be fixed. To do so, scroll down in the MiniDLNA configuration file and search for the following lines:
# Specify the user name or uid to run as (root by default).
# On Debian system command line option (from /etc/default/minidlna) overrides this.
#user=minidlna
Remove the starting hash from the user line. This tells the MiniDLNA Daemon to start the process as the user minidlna. The user minidlna was already created by installing MiniDLNA before.
Add media directories to MiniDLNA
MiniDLNA supports audio, picture and video files. You don’t have to store all files on one single hard disk to share them over MiniDLNA. However, you have to configure a media directory per storage. You can do this in the MiniDLNA configuration file, too:
# Path to the directory you want scanned for media files.
#
# This option can be specified more than once if you want multiple directories
# scanned.
#
# If you want to restrict a media_dir to a specific content type, you can
# prepend the directory name with a letter representing the type (A, P or V),
# followed by a comma, as so:
# * "A" for audio (eg. media_dir=A,/var/lib/minidlna/music)
# * "P" for pictures (eg. media_dir=P,/var/lib/minidlna/pictures)
# * "V" for video (eg. media_dir=V,/var/lib/minidlna/videos)
# * "PV" for pictures and video (eg. media_dir=PV,[...]
media_dir=/var/lib/minidlna
As you can see, in the default configuration file there is already a media directory set. However, that’s just an example and you have to change this to the actual directory where your media files are stored. As an example, a setup with three media directories could look like this:
media_dir=A,/mnt/usb/audio
media_dir=V,/mnt/usb/video
media_dir=P,/mnt/usb/picture
This would configure MiniDLNA to use the directorys /mnt/usb/audio as a source of audio files, /mnt/usb/video as a source of video files and /mnt/usb/picture as a source of picture files. You can also freely combine a directory to store different media types or simply store everything in one single directory. The latter one is what we’re going to do in this tutorial. Assuming that our external hard drive is mounted at /mnt/usb, as mentioned earlier, this is a one line entry:
media_dir=/mnt/usbAfter you’ve added the media directory, save and close the configuration file. To finally apply the changes to the MiniDLNA server, you have to restart the service:
user@server:~$ sudo systemctl restart minidlnaThe first scan process could take some minutes. When you’re copying / moving additional files over time into these directories, MiniDLNA will find them automatically. Look at the webinterface if you want to know if the scanning processes is finished (go to the next chapter to find out how to access the MiniDLNA webinterface).
Webinterface
MiniDLNA comes with a small webinterface. This webinterface is just for informational purposes. You will not be able to configure anything here. However, it gives you a nice and short information screen how many files have been found by MiniDLNA. MiniDLNA comes with it’s own built-in webserver. This means that no additional webserver is needed in order to use the webinterface.
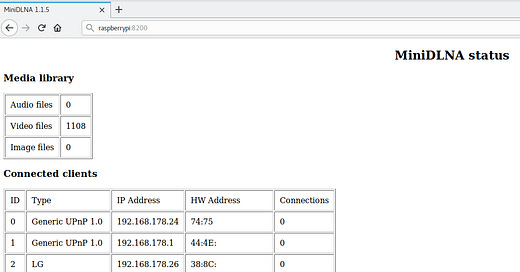
To access the webinterface, open your browser of choice and either enter the IP address or the hostname of the server / Raspberry you’re want to connect to, followed by the port 8200. For e.g.: http://raspberrypi:8200:
As you can see, I’m only streaming video files over this MiniDLNA setup. In the upper table you can see that my MiniDLNA setup is ready to stream 1108 video files on demand. The Connected clients table lists the actual connected clients. In this list I see devices like my Smart TV, my Playstation and many others. Even though a lot of these clients aren’t streaming right now, they keep an active connection to the MiniDLNA server (which is some kind of “auto discovery”). When they start to stream some files, you will see the actual connections in the last cell of the second table.
The actual streaming process
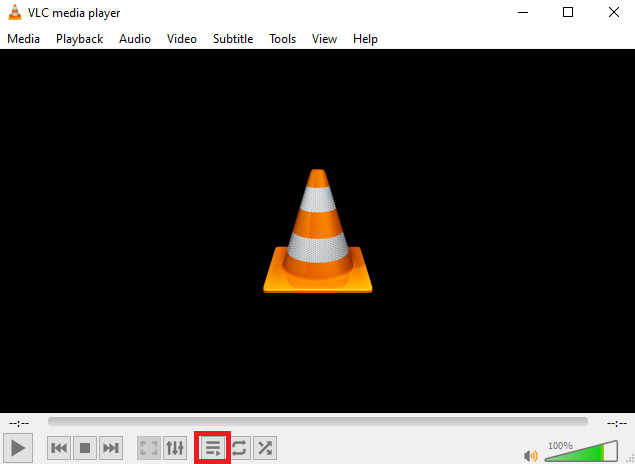
This paragraph is just a short overview how a connection from a client to the configured and running MiniDLNA server could work. In this scenario we simply use a computer which is in the same local area network than the server. As the client software we use the Video Lan Client. Simple, robust, cross-platform and open source. After starting VLC, go to the playlist mode by pressing CTRL+L. If this does not work for you, you can also click on the Toggle playlist button at the bottom.

You will now see on the left side a category which is called Local Network. Click on Universal Plug’n’Play which is under the Local Network category. You will then see a list of available DLNA service within your local network. In this list you should see your DLNA server (most likely in the form of servername: minidlna). Navigate through the different directories for music, videos and pictures and select a file to start the streaming process:
This is just an example of how to connect to your MiniDLNA server with a desktop client. VLC is also available for Android and iOS devices including Amazon Fire TV and Apple TV. Using MiniDLNA with VLC on an Android device even allows you to use the Chromecast to cast a music file, series of pictures or videos to your TV. However, if you have a Smart TV, most of them can connect to DLNA services directly.
Start, Stop and restart MiniDLNA
Starting, stopping or restarting the MiniDLNA service is „business-as-usual“. But just for the records, here are the commands:
user@server:~$ sudo systemctl start minidlna
user@server:~$ sudo systemctl stop minidlna
user@server:~$ sudo systemctl restart minidlna
Conclusion
Setting up your own DLNA server is really easy. If you use a Raspberry Pi in combination with a USB hard disk, you have a cheap but solid and flexible open source based solution. You are not forced to use a prebuild NAS appliance which maybe limits you in the maximal size of the hard disk or the file formats you want to use. Also, installing and configuring your own DLNA solution is a good learning experience. So what you’re waiting for. Start streaming your own movies, pictures and music via DLNA. And if you have any questions or you just want to let me know how your own DLNA setup looks like: Leave a message in the comments :-)
If you liked this article, please consider supporting me by either subscribring or using one of my referral links listed here.


